Objective:
Find the password to the next level
Intel Given:
- There are 2 files in the homedirectory: passwords.old and passwords.new. The password for the next level is in passwords.new and is the only line that has been changed between passwords.old and passwords.new
- NOTE: if you have solved this level and see ‘Byebye!’ when trying to log into bandit18, this is related to the next level, bandit19
How to:
Thanks to reddit user 177854 for providing this write-up!
From the last mission we didn’t get a password, insteadwe got a RSA private key. Private keys can be used to log onto servers that have been setup with a corresponding public key. This is actually the more secure method of ssh-ing into remote devices. The steps to use this on Putty make it long enough to be a blog post of it’s own, which we did here. For now we’ll be doing the Linux/Mac method.
First we’re going to have to import the Private key into our machine and save it as a text file. You can use any file editor you like (vi, vim, gEdit, Nano gVim Emacs..etc) for this exercise the commands are simple. Just type your file editor of choice and then the filename you wish to have. In this example we’re using vim. Will open a new blank text document where I will paste the private key.
vim bandit1617privatekey.txt

Perfect! Now that we have a Private key it’s time for us to logon to bandit 17. To do this we will still use ssh but with some different options to use the private key.

Uh oh. It looks like we are allowing other people permission to access our private key, and that’s not very good for security! Let’s go back and change our read write permissions on our file.
Linux permissions are very complex and we will only scratch the surface here. It IS a very important topic though and if you need a refresher or are learning for the first time check out some links here. www.linux.com/learn/tutorials/309527understandinglinuxfilepermissions. The basics are three permissions types (read, write, execute) along with three permission groups (owner, group, all other users). To change file permission on a file you use the chmod command. In the chmod command there are three spots for owner, group, and all others to have their file permissions added. The placement in the chmod command is important the 1st spot is for the owner, the second for the group, and the third for other users on our system, commonly referred to as global. The command looks something like this.
chmod [owner][group][global] file
Now what do we put in the spaces in the brackets to denote what permissions? Permissions types are given a number ,4 for read, 2 for write, and 1 for execute. The file permissions are a TOTAL of all the permissions that we would like that object to have. For example if I want to give owner full access and everyone in the group read and write access and everyone else read access I would enter the following:
read (4) + write(2)+ execute(1) = Full (7)
read(4) + write(2) = rw (6)
read (4) = 4
chmod 764 testfile
For our case here we don’t have to worry too much about this, we just have to prevent everyone except for us from accessing it. Nevertheless this is an important part of Linux systems and will come up later so if you are having a hard time understanding I suggest you do some further research on the topic. There are good options here, here, and here. Back to our private key we have to change our file permission to owner and only owner. So in the owner spot we will put 6 for read + write, in the group and everyone else spot we will put 0 for no access at all. Using the below command we change the permissions of the file and try connecting again.
chmod 600 Bandit1617pk

Success! Now after all that, what were we even supposed to be doing?
Ah yes there are two file that has a lot of text that look like passwords and the only difference between the two is the actual password. The command diff is exactly what we need in this situation. The diff command compares 2 files and outputs the difference in them, similar to the sort and uniq that we used a few lessons ago. Let’s see what the command outputs.
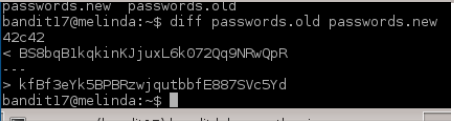
Hmm looks like two passwords. One for this level (instead of having to use that private key again) and one for the next!
Conclusion:
We learned a lot in this lesson. Sshing using private keys, Linux file permissions, and the diff command. If you don’t feel very comfortable using Linux file permission I suggest you take some time and thoroughly research it. It will be very important in a few lessons.


